유용한 정보
ChatGPT API 최근 풀리게 돼서 파생 활용 서비스 생기고 있다.
- chatGPT 이용 GitHub 요약 사이트

- AskUp : 카카오톡 chatGPT 연계 챗봇

- chatGPT는 사진 입력이 불가능하지만, 카카오톡을 통해 사진 업로드 시 OCR을 통해 사진 내부 글을 읽어 분석할 수 있다.
💡4장 피드백 Tip
- 그렇기에 주소를 비교하는 ‘==’가 아닌 값을 비교하는 equals()를 사용한다.
- String 배열 선언 시 초기 값은 null이다. (primitive type 배열은 기본 값을 가진다.)
📘 5장 메소드

메소드를 정의함으로서, 코드 길어지거나, 같은 코드 반복해야 할 때, 코드를 부품(component)화하고 분리해 재사용 가능하도록 하는 코드로 만들 수 있다.
함수(Function) 🆚 메소드(Method)
프로그래밍에서 둘 다 코드를 재사용하기 위한 기본적인 요소이다. 하지만, 두 용어는 사용되는 문맥에 따라 차이가 있다.
- 함수(function) : 객체와 무관하게 사용되는 입력에 대한 독립적인 기능 수행
- 메소드(Method) : 객체 내에 정의된 함수로서, 객체의 특정 기능을 수행하거나 객체의 상태 변경
chatGPT 대화 내용

메소드 정의
package com.example;

public class Main {
		// 메소드의 정의
    public static void hello() {
        System.out.println("안녕하세요");
    }
}
메소드 호출
package com.example;

public class Main {
    public static void main(String[] args) {
        System.out.println("메소드를 호출합니다");
        hello(); // 메소드 호출
        System.out.println("메소드 호출이 종료되었습니다");
    }

    public static void hello() {
        System.out.println("안녕하세요");
    }
}
인수(argument)와 인자(parameter)

예시
package com.example;

public class Main {
    public static void main(String[] args) {
        add(100, 20);
        add(200, 50);
    }

    public static void add(int x, int y) {
        int result = x + y;
        System.out.println(x + " + " + y + " = " + result);
    }
}
👀 Eclipse 활용 Tip


ctrl+space: 메소드에 어떤 Argument를 넣어야 하는지 설명을 볼 수 있다.
F2: 문서 보기
F3: 해당 메소드 코드로 이동
반환 값 (return)
package com.example;

public class Main {
    public static void main(String[] args) {
        System.out.println(add(add(10, 20), add(30, 40)));
    }

    public static int add(int x, int y) {
        int result = x + y;
        return result;
    }
}
오버로드(overload)

오버로드 - 인수의 타입이 다른 경우
public class Main {
    public static void main(String[] args) {
        System.out.println(add(10, 20));
        System.out.println(add(3.5, 2.7));
        System.out.println(add("Hello", "World"));
    }

    public static int add(int x, int y) {
        return x + y;
    }

    public static double add(double x, double y) {
        return x + y;
    }

    public static String add(String x, String y) {
        return x + y;
    }
}
오버로드 - 인수의 수가 다른 경우
public class Main {
    public static void main(String[] args) {
        System.out.println(add(10, 20));
        System.out.println(add(10, 20, 30));
    }

    public static int add(int x, int y) {
        return x + y;
    }

    public static int add(int x, int y, int z) {
        return x + y +z;
    }
}
Call By Reference
package com.example;

public class Main {
    public static void main(String[] args) {
        int[] numbers = new int[] {1, 2, 3}; // 배열 생성
        printArray(numbers); // 배열 출력 메소드
        System.out.println("------------");
        incrementArray(numbers); // 배열 값 1씩 증가
        printArray(numbers); // 다시 출력
    }

    public static void printArray(int[] nums) {
        for (int num : nums) {
            System.out.println(num);
        }
    }

    public static void incrementArray(int[] nums) {
        for (int i = 0; i < nums.length; i++) {
            nums[i]++;
        }
    }
}
리턴 값이 배열인 경우
package com.example;

public class Main {
    public static void main(String[] args) {
        int[] array = makeArray(3);
        for (int i : array) {
            System.out.println(i);
        }
    }

    public static int[] makeArray(int size) {
        int[] newArray = new int[size];
        for (int i = 0; i < newArray.length; i++) {
            newArray[i] = i;
        }
        return newArray;
    }
}
main 커맨드 라인 인수

📝연습 문제
5-1
다음 사양을 참고하여 메소드 “introduceOneself”를 정의하시오.
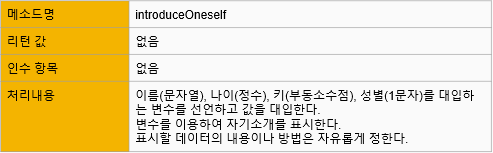
package com.example;

public class Exam5_1 {

    public static void introduceOneself() {
        String name = "keydi";
        int age = 50;
        int height = 200;
        char gender = '남';

        System.out.printf("안녕하세요. %s입니다. 저는 %d살 %d %c자입니다.\n", name, age, height, gender);
    }

    public static void main(String[] args) {
        introduceOneself();
    }
}
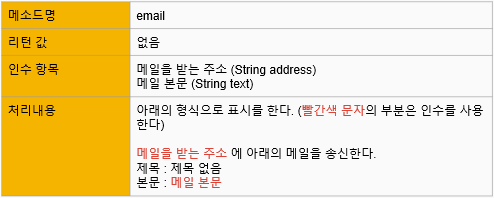
5-2
다음 사양을 참고하여 메소드 “email”를 정의하시오.

package com.example;

public class Exam5_2 {

    public static void email(String title, String address, String text) {
        System.out.println(address + " 에 아래의 메일을 송신한다.");
        System.out.println("제목 : " + title);
        System.out.println("본문 : " + text);
    }

    public static void main(String[] args) {
        email("안녕", "123@123.ac.kr", "반가워");
    }
}
✅ 5-3
다음 사양을 참고하여 연습문제 5-2의 코드에 메소드 “email”를 오버로드 하여 main 메소드에서 호출하시오
package com.example;

public class Exam5_3 {

    public static void email(String title, String address, String text) {
        System.out.println(address + " 에 아래의 메일을 송신한다.");
        System.out.println("제목 : " + title);
        System.out.println("본문 : " + text);
    }

    // 메소드 오버로딩 (기존 코드의 재사용)
    public static void email(String address, String text) {
        email("제목 없음", address, text);
    }

    public static void main(String[] args) {
        email("123@123.ac.kr", "반가워");
        email("안녕", "123@123.ac.kr", "반가워");
    }
}
5-4
다음 사양을 참고하여 메소드 “calcTriangleArea”와 “calcCircleArea”를 작성하시오.
적당한 값을 인수로 넘겨 올바른 면적이 표시되는지 확인하시오.


package com.example;

public class Exam5_4 {

    public static double calcTriangleArea(double bottom, double height) {
        // 소수 점 둘째 자리 반올림
        return Math.round((bottom * height * 0.5) * 100) / 100.0;
    }

    public static double calcCircleArea(double radius) {
        // 소수 점 둘째 자리 반올림
        return Math.round((Math.PI * Math.pow(radius, 2.0)) * 100) / 100.0;
    }

    public static void main(String[] args) {
        System.out.println(calcTriangleArea(4, 2));
        System.out.println(calcCircleArea(5));
    }
}
퀴즈
메소드를 활용하여 풀어보자.
⭐ 짝수 홀수
당신은 회사를 대표하여 2개의 숫자를 골라야 합니다. 두 수가 모두 짝수이면 홀수파(홀수를 좋아하는 사람들의 모임)가 싫어합니다. 두 수가 모두 홀수이면 짝수파가 싫어합니다. 당신 은 짝수 하나 홀수 하나를 골라서 모두를 만족시켜야 합니다.


/*
 * 홀수 짝수 쌍 판별
 */
package com.example;

import java.util.Scanner;

public class Quiz02 {
    // 홀수 판별
    public static boolean isOdd(int num) {
        return (num % 2 == 0) ? true : false;
    }

    // 홀수 판변 후 같은지 비교
    public static String solution(int n, int m) {
        boolean nIsOdd = isOdd(n);
        boolean mIsOdd = isOdd(m);

        return nIsOdd == mIsOdd ? "YES" : "NO";
    }

    public static void main(String[] args) {
        Scanner sc = new Scanner(System.in);
        int N = sc.nextInt();
        int M = sc.nextInt();

        System.out.println(solution(N, M));
    }
}


⭐ 등차수열
다음과 같은 수열을 출력하는 프로그램을 만들어 보자.
- 첫번째 숫자가 5에서 3 씩 증가 해가는 것을 알 수 있습니다.
- 일반적으로 이것을 첫항이 5, 공차가 3인 등차수열이라고 합니다.
- 이런 수열을 출력하는 프로그램을 만들어 보자.
- 수열의 첫항 m과 공차 n이 주어지면 10 번째까지의 숫자를 공백으로 구분하여 출력하는 프 로그램을 작성하시오.


/*
 * 등차수열 출력하기
 */
package com.example;

import java.util.Scanner;

public class Quiz03 {

    public static String solution(int startNum, int difference) {
        StringBuilder sb = new StringBuilder();

        for (int i = 0; i < 10; i++) {
            sb.append((startNum + difference * i) + " ");
        }
        sb.deleteCharAt(sb.length() - 1);
        return sb.toString();
    }

    public static void main(String[] args) {
        Scanner sc = new Scanner(System.in);
        int m = sc.nextInt();
        int n = sc.nextInt();
        System.out.println(solution(m, n));
    }
}


문자열 String 붙이기
문자열 붙이기는 4가지 방법이 있다.
Concat, ‘+’ 연산자, StringBuilder, StringBuffer가 있으며, Concat과 ‘+’ 연산자를 이용한 String 붙이기는 매 번 문자열을 추가할 때마다 새로운 인스턴스가 생성되기 때문에 성능이 좋지 못하다.
StringBuilder
StringBuilder는 새로운 String 객체 인스턴스를 메모리에 할당하는 과정 없이도 수정이 가능한 장점이 있다.
사용 방법
StringBuilder sb = new StringBuilder();
sb.append("str1");
sb.append("str2");
String concat = sb.toString();
StringBuffer
StringBuffer는 StringBuilder와 호환 가능하기 때문에 사용법은 동일하다.
StringBuffer와 StringBuilder의 차이점은 StringBuffer은 thread-safethread-safe 하다는 점이다. StringBuilder는 동기화를 보장하지 않는다.
- StringBuffer 클래스는 동시에 이 객체에 접근했을 때, 동시성을 제어해주는 기능이 존재
- StringBuilder 클래스는 동시성 제어 기능을 제외하여 상대적으로 동작속도가 빠르다.
사용방법
StringBuffer sbf = new StringBuffer();
sbf.append("str1");
sbf.append("str2");
String concat = sbf.toString();
그외 Tip
StringBuffer나 StringBuilder는 초기에 생성할 때 Buffer Size를 주도록 구성되며 이에 의한 생성, 확장 오버로드가 발생하기 때문에 의외로 Buffer Size를 잘못 지정할 경우 성능이 떨어질 가능성도 있다. 하지만 String 클래스의 경우 new에 의한 생성이 아닐 때 초기 컴파일러 분석 단계에서 literal 처리에 의해 최적화가 될 수 있기 때문에 오히려 빠른 결과를 보여줄 때가 있다.
[JAVA] 문자열 붙이는 방법 총정리(concat, StringBuilder, StringBuffer, + )자바에서 문자열을 붙이는 4가지 방법에 대해 정리해 보고, 또 각각의 차이점은 무엇인가에 대해서 알아보겠습니다. Concat concat은 String 클래스에서 제공하는 기본 메서드이며 동작 방법은 합친 문자열을 String으로 생성한다. concat() 메서드를 이용해서 문자열을 추가할 때마다, 새로운 인스턴스를 생성하기 때문에 성능이나 속도 면에서 좋지 않다. String str1 = "첫번째 텍스트입니다 "; String str2 = "두번째 텍스트입니다"; System.out.println("결과: " + str1.concat(str2)); //결과 : 첫번째 텍스트입니다 두번째 텍스트입니다 '+' 연산자 문자열을 붙일 때 가장 직관적으로 떠올릴 수 있는 방법이다. jdk 1.5 이전에는 con..https://junghn.tistory.com/entry/JAVA-문자열-붙이는-방법concat-StringBuilder-StringBuffer

StringBuilder, StringBuffer에서 마지막 문자 지우기
setLength(), deleteCharAt()
setLength(), deleteCharAt() 메소드를 활용해서 마지막 문자를 지울 수 있고, StringBuilder, StringBuffer 두 클래스 모두 동일한 API로 구현되어 있다.
사용 방법
StringBuilder sb = new StringBuilder("hello world.");
//StringBuffer sb = new StringBuffer("hello world.");

// 마지막 문자 제거
sb.setLength(sb.length()-1);    //1. setLength() 이용
sb.deleteCharAt(sb.length()-1); //2. deleteCharAt() 이용
// sb = "hello world"
Uploaded by N2T